
Teachers, be sure to check out this project in the course format.
I’ve always found students enjoy producing something tangible for design projects. In this project, the students will make a soap box illustrator project using two-color artwork in Adobe Illustrator. In the information below, I provide the creative direction and specifications to the students. Along with the instructional videos, the students should produce a viable product by the end of the project.
Before we start this project, I’ve already spent some time working on using an X-Acto knife with the students, so there is an expectation of understanding before providing the tools. Finally, it’s prudent to mention that I’m always open to allowing student modifications of assignments. Sometimes a student may have an exciting approach or idea, so I remain open to letting them express their voice and choice in the classroom projects.
Learning Objectives
- Students will produce a flat artwork template for a box product.
- Students will build complex artwork using two SPOT colors.
- Students will create 3D visualizations of a simple soapbox.
Materials & Resources
Before we begin the project, it’s important to refresh yourself on the differences between SPOT and process colors. The following articles will provide a brief overview of these differences, as well as key moments to consider using SPOT colors.
Understanding SPOT vs. Process Colors
https://www.pantone.com/articles/technical/spot-vs-process-color
7 Moments Every Designer Should Reach for Formula Guide
https://www.pantone.com/articles/technical/7-moments-every-designer-should-reach-for-formula-guide
Creative Direction
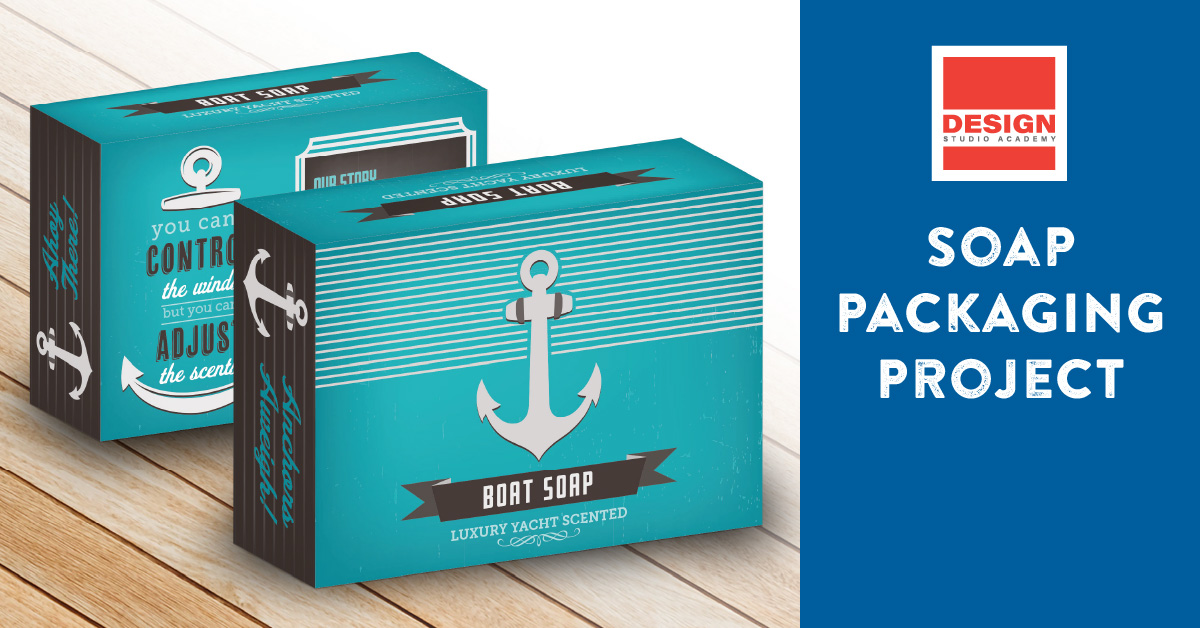
You’ve been hired to design a concept for a bar of soap. You have complete creative control over the name and the design of the box—provided it’s your original artwork. However, the client wants to see a mock-up of the soapbox in both physical and electronic forms. Furthermore, you are only allowed to use 2 SPOT colors for the project.
Artwork Specifications
- Only 2 SPOT PANTONE colors may be used! (You may use tints)
- Your box must measure 3.5″ x 2.5″ x 1.25″
- Box template must have a standard bleed for color.
- You must design all six faces of the soapbox.
- ALL ORIGINAL ARTWORK!
Creating the Box Template
The following video will demonstrate how to build a 3.5″ x 2.5″ x 1.25″ soapbox template. These dimensions closely match the soapbox dimensions Dove uses for their products.
Printing & Assembling the Soap Box
The following video will demonstrate how to use the manual feed tray in a color laser printer. Furthermore, the video will show how to cut, score, and fold the soapbox. I recommend using a cover stock for this project to help provide a rigid surface for building the soapbox.
Setting up for 2-Color Design
The following video will demonstrate how to prepare a file for 2-color artwork. While I already know the soapbox colors before beginning the project, you may need to think about what colors you’ll need. I find a Pantone Swatchbook is suitable for visually seeing the colors, as the previews in Adobe Illustrator may not represent how the product will print. If you need additional help choosing colors, you may want to look at Adobe Color for inspiration.
Designing the Soap Box
The following video will demonstrate how to design and produce a final soapbox. I am using purchased stock art to help me build this project. You’ll need to spend some time thinking about the design and how each face will appear to the viewer. I recommend printout out some templates and cutting them out, and using a pencil to sketch ideas. I find having a plan before entering the design program helps focus my thoughts.
Creating 3D Views
The following video will demonstrate how to create a 3D version of the soapbox using the Adobe Illustrator Extrude and Bevel effect. While my approach seems straightforward, we’ve had several issues with getting the symbols to work. We’ve found that you need to simplify the artwork before making the symbol (expanding shapes, pathfinders, etc.). This is a destructive process, so be sure to duplicate objects before simplifying them.
Assessing the Work
For this project, I would assess the students’ ability to create a template, use two colors, create 3D views, and their overall visual design.
Flat Artwork
Was the student able to successfully create the box template? I provide extra points for those willing to try something beyond what I provide.
Mastery: The student built a template by hand using measurements and drawing tools. All artwork was correctly placed with the appropriate bleeds and orientations. The student tried a unique packaging shape, and it enhanced the project.
Proficient: The student built a template by hand using measurements and drawing tools. All artwork was orientated correctly, but the student did no use bleeds correctly.
Developing: The student used a template that was available online or copied artwork from the internet.
Basic: The student was not able to build a working box template.
2-Color Design
Was the student able to successfully design using just two SPOT colors?
Mastery: The student effectively used two SPOT colors and tints for the artwork. The usage of colors enhanced the packaging and complimented the artwork.
Proficient: The student used two SPOT colors and tints for the artwork. The artwork and color worked well together.
Developing: The student did not effectively use two SPOT colors, or the colors did not enhance the illustration.
Basic: The student did not use two SPOT colors; instead, they used Process Colors.
3D Views
Was the student able to successfully create the 3D views of the soapbox?
Mastery: The student created different 3D views and nicely presented them.
Proficient: The student created 3D views but did not nicely present them.
Developing: The student attempted 3D views but gave it little effort or attention.
Basic: The student was unable to create the 3D views.
Visual Design
Did the student build a visually appealing product?
Mastery: The student applied the Principles of Design visually excitedly, which gave the project a tremendous visual impact on the intended audience.
Proficient: The student applied the Principles of Design to layout the project. But, there were issues with the layout and composition that needed to be addressed.
Developing: The student tried to apply the Principles of Design, but the overall composition and layout were weak or unattractive.
Basic: The student did not try to apply the Principles of Design to the project.
One Big Video
In my experience, I prefer to chunk content for the students into smaller videos. However, I know I’m presenting this on a closed Vimeo system. To help accommodate others, I’ve created a supercut of these videos on YouTube.


