
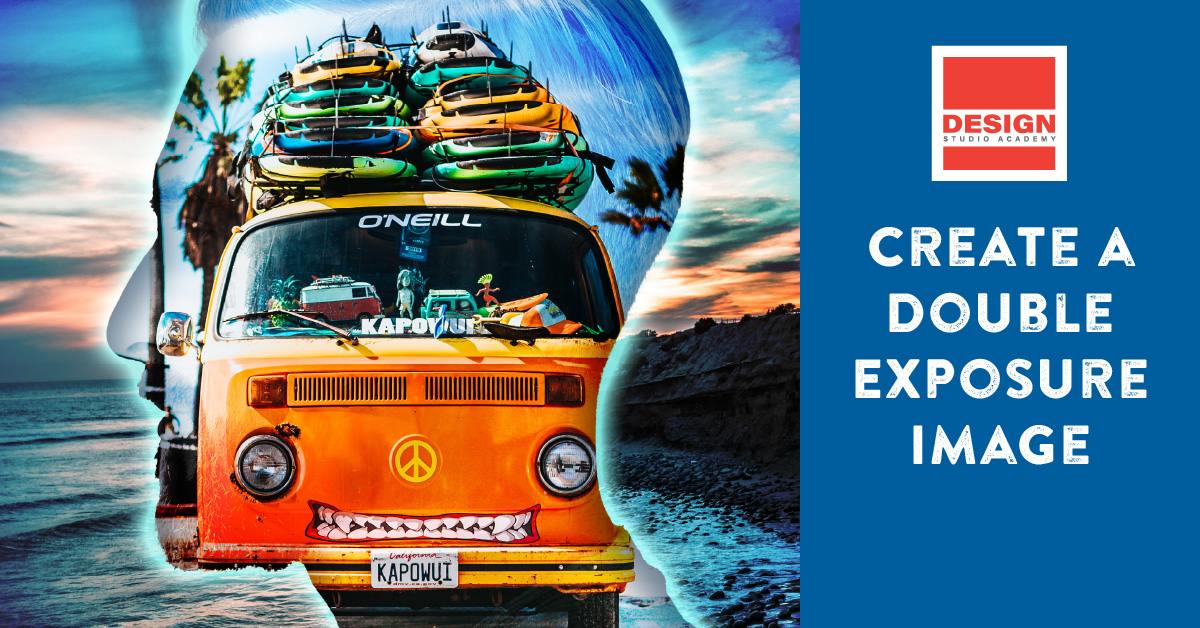
Want to create stunning double-exposure images combining two or more photos into one beautiful and unique composition? Look no further than Adobe Photoshop. This tutorial will cover essential skills such as creating new files, layering images, selecting subjects, adding color layers, and using layer blend modes to create a double-exposure image that’s sure to impress. Whether you’re new to Photoshop or a seasoned pro, this tutorial is perfect for anyone who wants to add a unique touch to their portraits. So, grab your favorite photos, and let’s get started!
Background Knowledge
Double exposure is a simple layering technique where two images are mixed. Before computers, double exposures were done in-camera. A photographer would expose the image on the film, then reload the film and create a second exposure over the first image. This was a tricky technique to master and difficult to pull off successfully. With the advent of computers, digital designers can now easily layer images to create a similar effect. Now that you understand the history let’s look at the skills required to create a double exposure. In the following video, I will demonstrate how to create a simple double-exposure image.
Learning Targets
- I can use layers to composite multiple images together.
- I can use layer effects and layer blend modes to enhance an image.
- I can show proficiency in following design specifications and constraints.
Design Studio Academy. (2023, Nov 9). Create a double exposure image [Video]. YouTube. https://youtu.be/1xTWCJ57oAo
Creative Direction
In this project, you will create a double-exposure image of yourself. Start with a profile (from the side) image of yourself. If you don’t have one, don’t worry; you can use the white background in the studio to capture the image. Next, find a representative image of your personality and work to create a double exposure of the two images. Once you finish the design, find fun fonts and sprinkle your strengths around your double-exposure image. If you feel my video is too introductory, I’m providing additional resources below to help you achieve different looks.
Design Specifications
Document Setup
- 1200 pixels x 600 pixels
- Landscape Format
- RGB Color
Design Constraints
- You must use an image of yourself (profile view preferable).
- All internet images must be documented and free from copyright & trademark infringements.
Design Submission
- Submit the final project as a JPEG file named LastName, First Name – Double Exposure.jpg.
- Submit the image citations in a separate Word Document.
Additional Resources
The following tutorials show different ways to achieve the double-exposure effect. Some intermediate to advanced techniques are presented in these videos, such as masking, curves, and gradient masks. So, please do your best to try the techniques and apply them to your image.
Tutvid. (2019, Aug 22). Double exposure effect photoshop tutorial [Video]. YouTube. https://youtu.be/HYVDlajEZOI?si=bcsXlUDviR9vEthn
LetsPhotoshop. (2018, May 21). Double exposure cinemagraph – Photoshop tutorial [Video]. YouTube. https://youtu.be/bX_h98OW4-8?si=T0DT4N5E9tQNclyX
PIXimperfect. (2017, May 7). Photoshop tutorial | Double exposure and photo manipulation with photo effects [Video]. YouTube. https://youtu.be/xFxylWAAFSM?si=_UxN7Zvk6M5ilaEk
Need more help with Photoshop?


