
What is Program AE Mode

Program AE mode is the first step to working your way to full manual control of the dSLR. In Program AE the camera is in control of the exposure of the image, by automatically choosing the best combination of aperture and shutter speed. In this mode you will have access to the White Balance and ISO controls, as well as some other functions such as Picture Style, Drive Mode, Auto Focus settings, etc. In this section we will work on mastering white balance and ISO functions.
What is White Balance
White Balance is how the camera perceives white light in the image. If you’ve ever been to the lighting aisle in the hardware store, you’ve been confronted with different temperatures of light—some are cool white, soft white, fluorescent, etc. Each of these lights can be measured on a Kelvin Color Temperature Scale to demonstrate the color they will appear when photographed.
Kelvin Color Temperature

Using the above scale, most cameras render daylight as 5200K. This is a warm light, that is pleasing the eye and makes the skin tones look good.
Going from warm to cool we start with tungsten lighting at 3200k. These are you indoor light bulbs, generally labeled as “soft white” light bulbs. Tungsten lights are also known as hot lights, as these generate a lot of heat in the studio. With the advent of bi-color LED lights, the use of tungsten lights is slowly fading.
The next stop on the Kelvin scale is fluorescent lights at 4000k. These lights appear green when the camera is set to daylight. Unfortunately, these lights can be tricky to work under. There are many different shades of fluorescent in the consumer market, and they can be a nightmare when trying to color correct.
Cloudy and shade settings, 6000k and 7000k respectively, tend to look similar. These are situations where the light appears cooler to the camera and needs to be warmed slightly.
Working with Color Temperature
Now, knowing the individual kelvin temperatures and corresponding light is not as important as understanding the concept that the camera needs to be adjusted to deal with each individual lighting setting.

The easiest way to adjust the camera is to set it for Automatic White Balance and forget it. This will work for 80% of your shooting situations. Places where it may fail, are when you have colored lights on your subject, or if you’re trying to achieve a creative effect. Also, I’ve personally come across issues when shooting video and the camera adjusting the color temperature mid-shot when panning in a hallway. So, in this situation, I would choose to set the white balance before the shot and make adjustments in post-processing.
Correcting White Balance in Adobe Lightroom
Video Overview
In this video, you will learn how to move files during import. You will then create a collection and use the white balance adjustment tools to fix the white balance of an image.
What is ISO

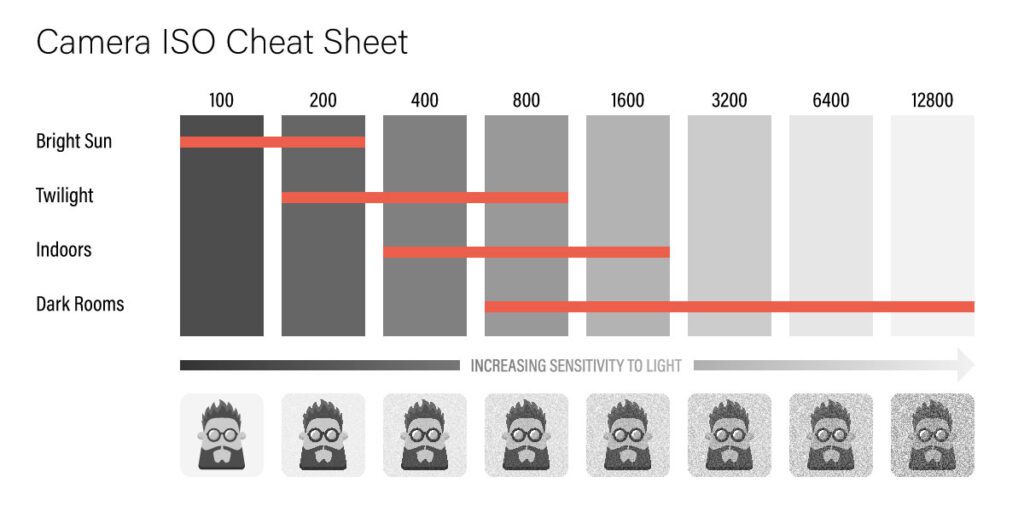
The ISO setting on a dSLR helps determine how sensitive the camera’s sensor will be too light. Before the advent of the digital camera, film was rated with different ISO’s, and you would need to choose the correct film based on the situation you would be photographing in. Now, with digital cameras, you can instantly change the ISO setting to get the desired sensitivity from the camera’s sensor.
The settings for ISO may vary from camera to camera, but typically it ranges from ISO 100 to ISO 12,800. ISO 100 is the least sensitive to light, which means you will need more light to correctly expose the image. This setting will also produce a better image when compared to a higher ISO as the camera has adequate time to expose the image and generate the image data needed to produce a well-saturated image. ISO 12,800 is the most sensitive to light. This setting will give you the ability to expose an image in very little light. However, the images at this ISO will have noise and be less saturated.
Understanding Sensor Noise

The above image was taken on a Nikon D100 Camera at ISO1600. On the left is the full image, and on the right is a 100% preview of the image. You can clearly see the noise that is introduced from the sensor in the image. This noise doesn’t mean the image is unusable, as you can see at smaller sizes the noise is undetectable to the eye, however, if you wanted to make a large gallery print it would become an issue. Finally, it can be difficult to see the noise on the camera’s preview screen, so it may not become evident until you are done shooting and processing the images–so it’s important to know your equipment.
Your Turn
It’s time to apply these skills to some photographs. Turn your camera dial to Program AE mode and work on choosing the correct ISO for where you are shooting. Also, practice taking shots inside and outside and work on getting the correct white balance for each shot. When you’re done, repeat the steps for importing the images into Lightroom.
Kelvin Light Scale image from: “Color Balance” by Wikipedia is licensed under CC BY SA 4.0